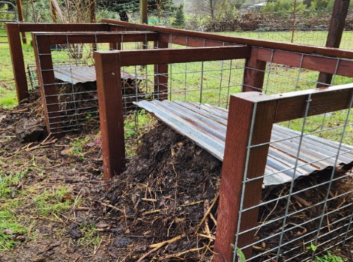
Starting a compost pile in winter may not be at the top of your to-do list, but it may be just the thing you need to beat the winter doldrums. Your reward will be soil that is more fertile, supporting bigger and heather plants in next summer's garden.
Types of composting: There are two primary ways to compost in the garden. There is the slow ‘cold' method, where you keep piling material in a heap and leave it largely unattended, probably for longer than a year. Then there is the fast ‘hot' method, which is what Master Gardeners recommend. This fast method not only gives you finished compost in 4-6 weeks but also ensures more consistent results and is more likely to kill weed seeds & pathogens. You do not need to run out and buy anything - however, it does require a bit of elbow grease.
Building your ‘hot' pile: Composting relies on the work of many bacteria, fungi, and invertebrates that consume and break down plant matter. They need oxygen to stay alive. This means that your pile must stay fluffy and have air pockets throughout. In addition to air, the micro organisms also need a certain amount of heat to thrive. Together, these two factors mean that a pile should not be so big that the bottom layers are crushed by the weight above, and a pile should not be so small that too much heat from the organisms escapes. Experience shows that a starting pile 3' x 3' x 3' in size will have about the proper proportions. Your pile should be placed directly on the soil and kept in place with a simple ring of fencing material or a similar enclosure. Plastic enclosures are discouraged because the airflow is restricted.
Because you will want the finished compost to provide a well-balanced set of nutrients for your plants, the nutrients in the source material must also be in reasonable balance. The focus specifically is on balancing nitrogen and carbon. For the most part, nitrogen-rich components are green (spinach, for example), and carbon-rich components are brown (wood chips, for example). Click here for additional information about “greens and browns”. Be sure to chop larger pieces to 6” or shorter, as they will compost much faster. Layer several inches of ‘greens' alternating with several inches of ‘browns.' Note that no meat, dairy, or oil should be added to the pile, nor should diseased plant materials or noxious plants with seeds be included.
Pay attention to the water content of your pile. The micro organisms require moist, but not soggy, conditions, and you can achieve this by spraying water on the pile while turning or by placing a cover over it when significant rain is in the forecast.
Turning your pile: Once you have built your pile, wait a number of days for the micro organisms and invertebrates to settle in. Some critters will already be in the raw materials, others will travel up from the soil below, and their activity will start warming the pile. Your active pile will start shrinking, and you can stick your hand toward the pile's center to get a rough feel for the heat level. The desired temperature range is 130 - 160 degrees F; you should turn the pile in that temperature range after about three days. If the pile isn't heating up, it could be that you have not reached a critical mass of materials, or there isn't enough green to go with the brown, or the pile is too green and soggy and needs more browns. Turning your pile with a garden fork onto an adjacent area gives you an opportunity to move the less digested plant materials at the edges toward the middle of the new pile, add water, and introduce new air pockets. A well-managed pile will need to be turned at least once a week, will stay hot for 2 or 3 weeks, and then cool and be recolonized by worms and other soil organisms. In 4-6 weeks, you will have finished compost that can be used to enrich your soil.
Using your compost: Your compost is ready to be spread on your garden beds when it has a crumbly texture with no recognizable bits of vegetation remaining. It will have a fresh, earthy smell. Compost does not need to be worked into the soil; the worms will take care of that for you… But if you are turning your soil, this is a good time to add it.
Links: We encourage you to look at the links to the online material below. The YouTube videos are all very short and practical, while the material on the Master Gardeners' composting page has more technical information.
UC Master Gardeners of Humboldt & Del Norte Counties composting page: https://ucanr.edu/sites/hdnmastergardeners/Resources_for_Home_Gardeners/Composting/
Demonstration videos from the Orange County Master Gardener Program:
What is Composting – https://youtu.be/8Hzz56vV9Mw
How to start a compost pile – https://youtu.be/Z2fIY7eN8fI
How to turn a compost pile – https://youtu.be/lkGRsPm-gt4
What is Hot Method? What is Cold Method? – https://youtu.be/PRpc7o_AaUc
Why are these bugs in my compost pile? - https://youtu.be/VAyM9BjEv9I
Cornell Waste Management Institute, Composting: Balancing Your Greens and Browns https://cwmi.css.cornell.edu/balancing.pdf
